

In order to use UTGB, you need to install Java Development Kit (JDK) version 1.5 or higher. Visit the Oracle's Java web site http://www.oracle.com/technetwork/java/index.html, and follow the installation instruction of the JDK.
The UTGB Toolkit can be installed with a Java Web Start-based GUI installer:
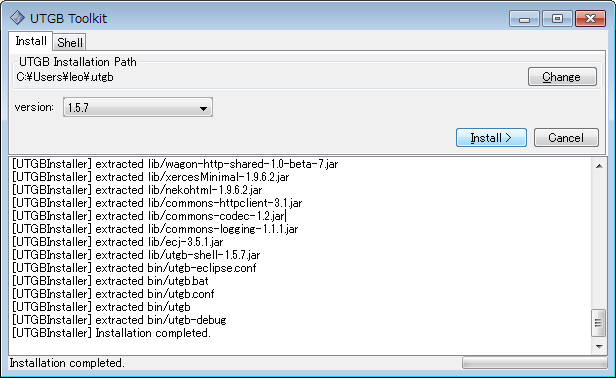
Installation of UTGB is now completed. Next, you need to set up some environmental variables according to your machine platform:
UTGB Toolkit is a command-line tool, so you need to add the utgb command location to your PATH environment variable:
Set two environment variables PATH and JAVA_HOME in an appropriate file; e.g., .profile, .bash_profile (for Bash user), .zprofile (for ZSH), etc.
export PATH=$HOME/.utgb/bin:$PATH
export JAVA_HOME=`/usr/libexec/java_home`export PATH=$HOME/.utgb/bin:$PATH
export JAVA_HOME=/usr/java/jdk1.6.0_03(Modify the above path according to your JDK location)
In Windows, press Win + Pause (or open Control Panel - System - Settings) to open Environment Variable panel, and set two variables PATH and JAVA_HOME as follows:
PATH = (UTGB_HOME)\bin;%PATH%
JAVA_HOME = C:\Program Files\Java\jdk1.6.0_03
Replace the above (UTGB_HOME) to your UTGB installation path (e.g., c:\Users\leo\.utgb ), and also the JAVA_HOME variable according to your JDK (1.5 or higher) installation.
Type utgb in Command prompt, (in Windows), terminal shell (in Linux and Mac OS X), or any terminal you like. If you see the following message, you are ready to use UTGB:
$ utgb
UTGB Shell: version (1.5.7)
type --help for a list of the available sub commands.To create your own genome browser, type utgb create (your project name):
$ utgb create myapp
[ScaffoldGenerator] create a directory: ./myapp/src/main/java
[ScaffoldGenerator] create a directory: ./myapp/src/test/java
[ScaffoldGenerator] output folder: ./myapp
[ScaffoldGenerator] packageName  = myapp
[ScaffoldGenerator] moduleName   = myapp.gwt.Browser
[ScaffoldGenerator] utgbVersion  = 1.5.7
[ScaffoldGenerator] clientPackageName    = myapp.gwt.client
[ScaffoldGenerator] explodedWebappDir    = target/utgb
...
The utgb create command generates a template code of the UTGB browser. In the above example, myapp is your project folder containing the web page and configuration files of the genome browser.
Next, move to the myapp directory, then type utgb gwt to create an web interface of the genome browser:
$ cd myapp
$ utgb gwt
[ScaffoldGenerator] output folder: .
[ScaffoldGenerator] packageName  = myapp
[ScaffoldGenerator] moduleName   = myapp.gwt.Browser
[ScaffoldGenerator] utgbVersion  = 1.5.7
[ScaffoldGenerator] clientPackageName    = myapp.gwt.client
[ScaffoldGenerator] explodedWebappDir    = target/utgb
[ScaffoldGenerator] serverPackageName    = myapp.gwt.server
...
[ScaffoldGenerator] create a file: ./src/main/java/myapp/gwt/public/browser.html
[ScaffoldGenerator] create a directory: ./src/main/java/myapp/gwt/server
[ScaffoldGenerator] create a file: ./src/main/java/myapp/gwt/server/RPCServiceImpl.java
[UTGBShell] create a file: eclipse/myapp-gwt.launch
$The generated UTGB project consists of several Java source codes. Before launching the UTGB's web server, you need to compile these codes:
Now you are ready to launch the genome browser. The UTGB toolkit is bundled with a portable Tomcat web server. So, you can start your genome browser instantly on your computer. To launch UTGB,
Track is a basic unit of the data display in UTGB. You can create your own tracks by importing BED, WIG, BAM files into UTGB. Advanced users can create their own tracks by writing codes (See also UTGB Manual for developing tracks).
Here is an example of UTGB, displaying the genome sequence of C. elegans (in FASTA format), conservation track (in WIG format), and gene annotations (in BED format).
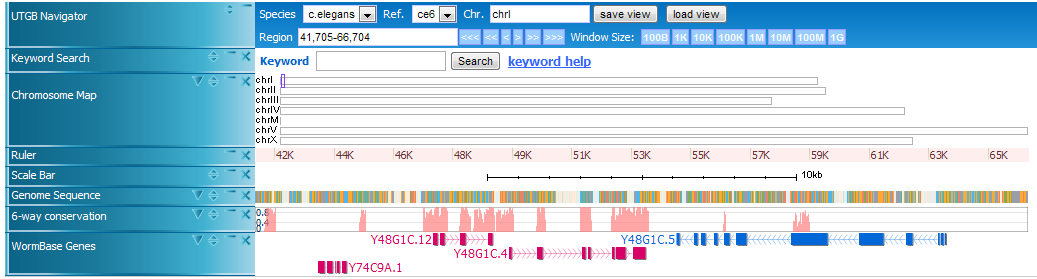
In UTGB you can use Left and Right cursor keys to scroll the display, and Up and Down to zoom out and in the display.
You can configure the UTGB's web interface by editing config/default-view.silk file in your project folder. This file is called track view file, written in Silk format (http://utgenome.org/toolkit/silk.html). Silk is a text format for describing structured data at ease. Here is an example of a track view:
-track group
  -coordinate
    -species: human
    -ref: hg19
    -chr: chr1
    -start: 1
    -end: 10000

-track
 -name: Ruler
 -class: RulerTrack

-track
  -name: BED Track
  -class: ReadTrack
  -property
    -path: db/sample.bed
This view file displays two tracks (Ruler and BED Track) and specifies the default display location of the genome browser at hg19, chr1:1-10000. In Silk format, indentation via spaces represents a hierarchy of data elements. You can edit view files using your favorite text editors. To apply the changes you made to the view, simply reload the web page in the browser.
To display a genome sequence as a track, you need to create a sequence database from a FASTA file. For example, download a FASTA archive available from UCSC's web site (e.g., fasta file of S. cerevisiae is available from http://hgdownload.cse.ucsc.edu/goldenPath/sacCer3/bigZips/chromeFa.tar.gz ), then do utgb import:
$ utgb import -t FASTA db/chromFa.tar.gz -o db/sacCer3.sqliteIt generates a compressed FASTA database (SQLite file) db/sacCer3.sqlite. Next, add a track entry to your config/view/default-view.silk file:
-track
 -name: Genome Sequence
 -class: RefSeqTrack
 -property
  -path: db/sacCer3.sqlite
This will add a new track named Genome Sequence to your genome browser.
To display genes, annotation in genomes, read data written in BED, SAM and BAM (http://samtools.sourceforge.net/) formats, ReadTrack can be used. For displaying contents in BED and SAM files, you need to import these files with utgb import command. BED is a common format for describing genes (including CDS, exon/intron regions) or a set of loci on genomes. Sample BED files can be obtained from UCSC's table browser, http://genome.ucsc.edu/cgi-bin/hgTables. For example, to retrieve a RefSeq gene set in BED format, select refGene table and switch the output format to BED.
# create a BED database
$ utgb import db/refGene.bed

# create BAM (.bam) and BAM Index file (.bai) from the input SAM file
$ utgb import db/shortread.sam
Then, edit your view file:
# Track for BED data
-track
-name: RefSeq Genes
-class: ReadTrack
-property
-path: db/refGene.bed
# Track for BAM data. In this example, db/shortread.bam.bai file must be present.
-track
-name: Short Read
-class: ReadTrack
-property
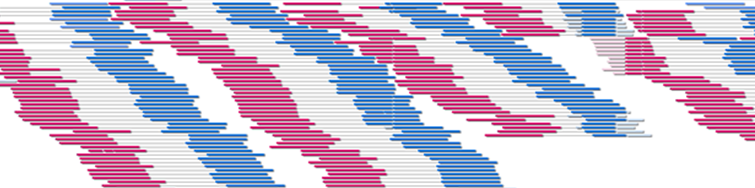
-path: db/shortread.bamHere is a screenshot of displaying a BAM file of Illumina's paired-end library data:
To display bar graph data (e.g., read depth coverage, GC contents percentage data for each locus on genome), use WIG format http://genome.ucsc.edu/goldenPath/help/wiggle.html and WigTrack;
utgb import of WIG files:
$ utgb import sample.wig

# Track for WIG data
-track
 -name: bar graph
 -class: WigTrack
 -property
-path: db/sample.wig.sqliteYou can create read depth (coverage) graph data from BAM files by using utgb readdepth command.
$ utgb readdepth (BAM file) > readdepth.wigWig files are large in general. To save the storage space you can directly create wig databases of read coverage as follows:
$ utgb readdepth (BAM file) | utgb -t WIG import -o readdepth.wig.sqliteTo add keyword search functionality, add the following track definition to your view:
-track
 -class: KeywordSearchTrack
To add keyword entries to the database from the read names in BED/SAM/BAM files, use utgb keyword command:
$ utgb keyword import (BED/SAM/BAM file)It is also possible to add your own keywords associated to a locus on a genome sequence. For details, see a help message in utgb keyword -help.
To switch a set of tracks to display, create another view file in config/view folder (e.g., config/view/sample.silk). You can switch the view using a URL query parameter. For example, an URL http://localhost:8989/browser.html?view=sample will show the tracks described in config/view/sample.silk file. If no view parameter is specified, config/view/default-view.silk will be used as a default view.
If you want to publish your web browser using web servers running Apache or Tomcat, read the instruction described in http://utgenome.org/toolkit/deploy.html

This work is licensed under a Creative Commons Attribution-ShareAlike 2.5 License.