

The UTGB Shell is a set of supporting utilities to develop your own tracks for querying and visualizing biological data. This document is a quick start guide for beginning track development with UTGB in 30 minutes.
In order to use UTGB, you need a JDK (Java Development Kit) version 1.5 or higher. If you have no JDK in your OS, visit the Sun's Java site (http://java.sun.com), and follow the installation instruction.
export UTGB_HOME=$HOME/local/utgb-shell-1.1.3
export PATH=$UTGB_HOME/bin:$PATH
export JAVA_HOME=/usr/java/jdk1.6.0_03Type, utgb from your Command Prompt or Cygwin (in Windows), shell (in Linux and Mac OS). If you see the following message, your installation is succeeded.
leo@leopardcat~/../workspace> utgb
UTGB Shell: version (1.1.0) (Revision: 1755)
type --help for a list of the available sub commands.
UTGB command has several sub commands. To see a list of all sub commands, type utgb --help.
UTGB Shell: version (1.1.0) (Revision: 1339)
usage: utgb <subcommand> [option] [args]
Type utgb <subcommand> --help for a help on a specific subcommand.

 -h,  --help    display help message
 -v,  --version display version

[sub commands]
  action        add a new web action handler
  compile       compile java source codes
  create        create a new Maven/Eclipse project for implementing your own track.
  dbinfo        displays database information
  deploy        deploy the war file to the remote tomcat server
  maven         execute maven tasks
  query         performs a query for a database described in the config/track-config.xml file
  server        start up the portable web server
You can see a individual help message for each sub command by typing utgb (sub command) --help.
Type utgb create (your project name):
> utgb create myapp
[Create]        package  = myapp
[Create]        explodedWebappDir        = target/utgb
[Create]        projectName      = myapp
[Create]        group    = org.utgenome.track
[Create]        project folder: myapp
[Create]        create a directory: myapp/src/main/java
[Create]        create a directory: myapp/src/test/java
[Create]        create a directory: myapp/config
[Create]        create a directory: myapp/db
[Create]        create a directory: myapp/lib
[Create]        create a directory: myapp/src/main/webapp
[Create]        create a directory: myapp/src/main/webapp/image
[Create]        create a directory: myapp/src/main/webapp/WEB-INF
[Create]        create a directory: myapp/tomcat
[Create]        create a directory: myapp/tomcat/webapps
[Create]        create a directory: myapp/tomcat/webapps/ROOT
[Create]        create a directory: myapp/tomcat/webapps/ROOT/WEB-INF
[Create]        create a file: myapp/config/track-config.xml
[Create]        create a file: myapp/db/README
[Create]        create a file: myapp/lib/README
[Create]        create a file: myapp/pom.xml
[Create]        create a file: myapp/README
[Create]        create a file: myapp/src/main/webapp/404.jsp
[Create]        create a file: myapp/src/main/webapp/image/utgb.gif
...
Create command for the first time after your UTGB installation will take longer time for downloading necessary JAR files into your local hard disk. Cross your fingers, and wait the completion. In the next time, the create command will finish in several seconds.
UTGB project consists of several Java files, and you need to compile them before launching the UTGB server. Switch to the newly created project folder (at this time, myapp folder) , then type utgb compile to generate binary codes of them. If your Java installation is missing or JAVA_HOME environment variable is not set properly, you may find some errors. In these cases, check your configuration.
UTGB is bundled with a portable Tomcat server. So, you can start the your web application (track project) immediately. Type utgb server to launch the web server. If you like to use GUI interface, type utgb server -g; a GUI interface to launch the server will appear. The UTGB portable server uses a port 8989 in default. You can change the port number using -p option. For details, type utgb server --help. You can stop the server just by pressing Ctrl+C in your shell.
To confirm your web application is working correctly, open http://localhost:8989/myapp in your web browser (IE, Firefox, Opera, etc.)
UTGB track (web application) consists of a set of actions, which are accessible from http://localhost:8989/myapp/(action name). To add your own action, type utgb action (action name). It will add a new action into you web application. To enable the new action in your web server, you need to issue the compile command again, and have to restart the web server.
myapp> utgb action HelloWorld

myapp> utgb compile

myapp> utgb server
You may see the new action from http://localhost:8989/myapp/HelloWorld or http://localhost:8989/myapp/helloworld (lower case name).
A web action receives a set of URL query parameters in the form of String. For example, a request http://localhost:8989/myapp/helloworld?name=leo&year=2008 has two parameters, name and year. In the traditional web application development (e.g. CGI), you have to convert the data type of these values; for example, the name value is String itself, and the year value must be translated from String to Integer. To program these processes is bothersome and usually error-prone. In UTGB, these tasks can be performed in a simple manner. All you need to do is to add appropriate setter methods in your action. UTGB automatically translates String input values in a URL request by investigating the setter's argument type.
public class HelloWorld extends WebTrackBase
{
    private static final long    serialVersionUID    = 1L;
    private static Logger _logger = Logger.getLogger(HelloWorld.class);

    private String name = "World";
    private int year = 2007;
    public HelloWorld()
    {}

    public void handle(HttpServletRequest request, HttpServletResponse response)
    throws ServletException, IOException
    {
        response.getWriter().println("Happy new year! " + name + ":" + year);
    }

     // setters for year and name parameters
     public void setYear(int year) { this.year = year; }
     public void setName(String name) { this.name = name; }
}UTGB has a built-in support of database access for SQLite, PostgreSQL, MySQL, etc. In order to use such DBMSs, you need to add some configurations in !config/track-config.xml file. Here is an example of the database configuration. One of the database tags below shows an example using SQLite database, whose file is placed at !db/mydb.sqlite. The address path is relative to the project folder. The next database tag is an example using PostgreSQL database served at localhost:5432 whose database name is 'addressbook'. Each database configuration is associated with an database ID, 'mydb' or 'pgdb'. In the web action code, you can refer these IDs to access these databases.
<config version="1.0">
  <group>org.utgenome.track</group>
  <projectName>myapp</projectName>
  <package>myapp</package>
  <import actionPackage="org.utgenome.gwt.utgb.server.app" alias="utgb-core" />

  <!-- settings for using SQLite database in the local hard disk -->
  <database id="mydb">
    <connection dbms="sqlite">
      <address>db/mydb.sqlite</address>
    </connection>
  </database>

  <!-- settings for using local PostgreSQL database server at port 5432 -->
  <database id="pgdb">
    <connection dbms="postgres">
      <address>localhost:5432/addressbook</address>
      <user>postgres</user>
      <pass>(password)</pass>
    </connection>
  </database>
</config>
Note that for a licensing reason, we cannot include MySQL's JDBC library, which is licensed under the GPL (Gnu Public License), in the UTGB package, since the UTGB is licensed under the Apache License version 2.0. The main difference between these licenses is that GPL forces every program using GPL-licensed codes also must be licensed under the GPL, while the Apache license is applied in file basis, so your codes generated by UTGB or just using UTGB libraries have no need to be licensed under the Apache license. If you see no problem in applying the GPL license to your source codes, you can use MySQL databases in the UTGB by setting dbms=mysql in the connection tag in the configuration file. In this case, download the MySQL's JDBC library from the web, and add it to your classpath.
After you have done the database configuration, you can test your settings using utgb dbinfo command, which will display the schema information of the specified databases.
myapp> utgb dbinfo
[DBInfo]        database ID: mydb

[DBInfo]        table: gene
[DBInfo]         column: id (integer)
[DBInfo]         column: target (string)
[DBInfo]         column: start (integer)
[DBInfo]         column: end (integer)
[DBInfo]         column: strand (string)
...
To actually see the database content, you can use utgb query command, which receives a database ID and a SQL query, then performs the database query:
myapp> utgb query mydb "select * from gene"

0|chrX|70518318|70518344|+|+_1(1,0,0,0)|
1|chr12|51949963|51949989|-|-_1(0,1,0,0)|
2|chr6|48444655|48444681|-|-_1(0,0,0,1)|
3|chr13|109111185|109111211|-|-_1(0,0,0,1)|
4|chr5|133731340|133731366|-|-_3(0,0,0,1)|
5|chr20|61835474|61835500|-|-_1(1,0,0,0)|
....
Eclipse is an excellent open-source IDE for developing Java programs. We strongly recommend you to use Eclipse in developing your track programs.
In order to start track development with Eclipse, type utgb eclipse in your project folder. Eclipse project files, .project and .classpath will be created in the folder. Then import your project folder in your Eclipse.
For the first time, you have to set two class path variables in your Eclipse:
M2_REPO = (Your Home Directory)/.m2/repository
UTGB_HOME = (Installation folder of the UTGB)
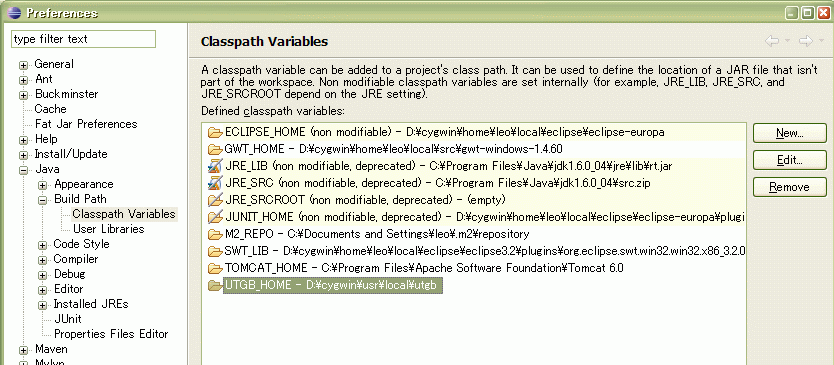
These two variables are the same used in the Installation of UTGB.
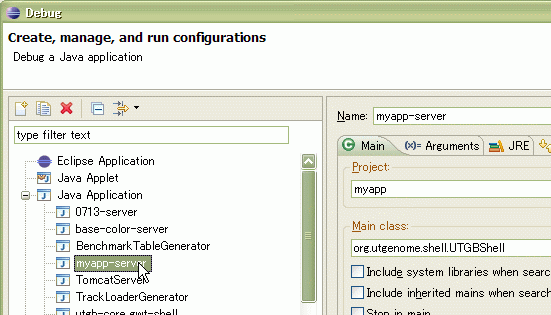
In the debug dialog of the Eclipse, you will find (your-app-name)-server item in the Java Application, which will start the local web server.
While you are coding the web application, Eclipse automatically reloads your change to the source codes, so interactive editing of your web application becomes possible with Eclipse.
Use utgb gwt command:
myapp> utgb gwt
myapp> utgb compile
After the compilation of GWT codes (it usually takes a minute or more), you can see the GWT interface of the genome browser. First, launch the local web server,
myapp> utgb server
then, open the page, http://localhost:8989/myapp/UTGBEntry.html

You can modify the track contents by editing src/main/webapp/view/default-view.xml file. The format used in this XML file is the same with XML data that can be obtained from the save view button of the UTGB browsers.
To use another type of views, add a view parameter to the above URL, as follows:
http://localhost:8989/myapp/UTGBEntry.html?view=anotherview.xml
This URL loads !src/main/webapp/view/anotherview.xml file, then shows the track contents described in the view XML file.
To change the default parameter values such as species, revision, target etc. you can also use query parameters of the URL:
http://localhost:8989/myapp/UTGBEntry.html?species=medaka&revision=version1.0&target=scaffold1
This URL shows a browser page of medaka, version1.0, scaffold1.

This work is licensed under a Creative Commons Attribution-ShareAlike 2.5 License.